Using the redesigned New Orders tab Copied
Navigating to the New Orders tab
- Open a patient chart and navigate to the current Orders
- Select the New Orders
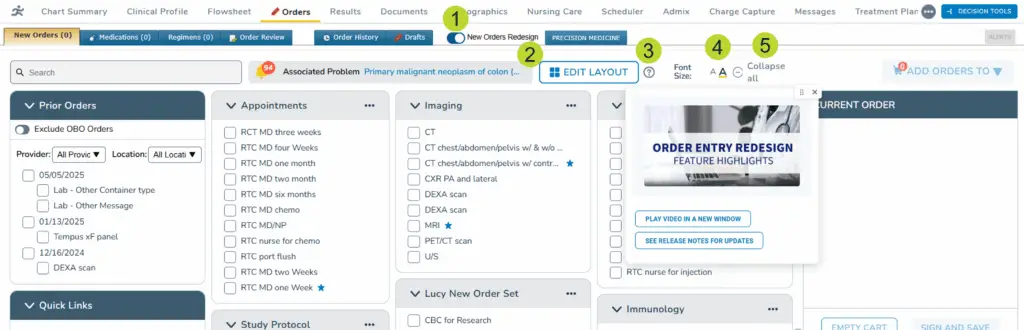
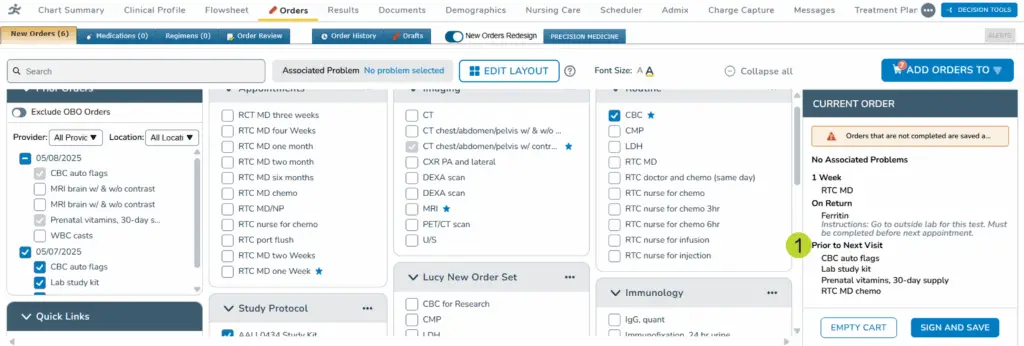
- Toggle on the New Orders Redesign to begin using the enhanced feature (callout 1).
- Order reminders will continue to appear next to the Associated Problem field with a bell icon (callout 2). The reminder will be removed once an order is placed for the needed medications, labs, images, services, or supplies.
- To watch a video highlighting the new features in the redesigned tab, click the “?” icon (callout 3).
- The font on the screen can be adjusted for a smaller or larger size using the Font size options to control how much information appears on the screen (callout 4).
- All order containers can be expanded or collapsed using the option at the top, right on the page (callout 5). This feature allows users to control how much content they want to see at once.
Placing new orders
Before ordering items, please be aware that items excluded from search results in the New Orders tab by your practice will not be added to the cart.
If you attempt to add these items, a message will appear indicating that these items are unavailable due to your practice’s settings. This can help prevent ordering items no longer used or supported by your practice.
Placing a new order using Prior Orders
Access past orders and filter them by provider or location to quickly add them to new orders. To order from prior orders:
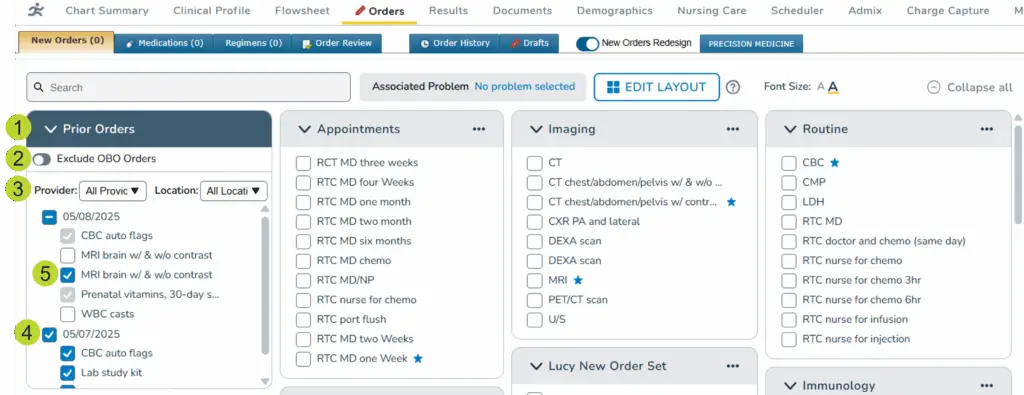
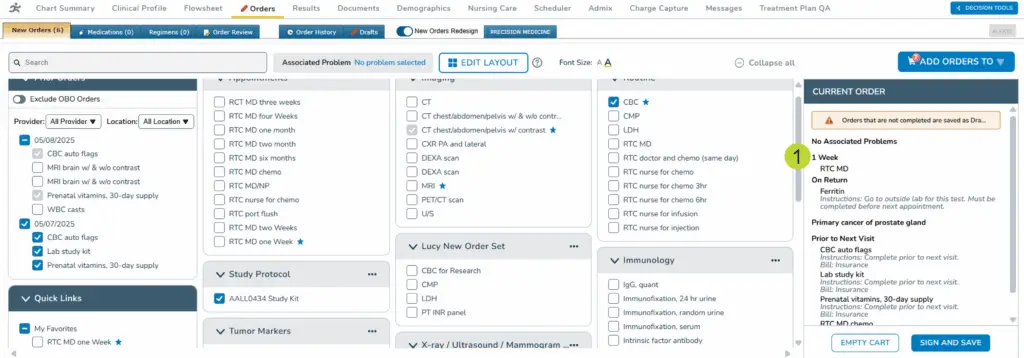
- Click Prior Orders to expand the list (callout 1).
- This list will display orders entered within the last 18 months, allowing you to efficiently add past orders to the cart without switching between screens or relying on memory.
- Once you expand the list, it will remain expanded across additional charts and the system will retain this view in subsequent logins. If you prefer not to keep the list expanded, then collapse it, when finished.
- Click the Exclude OBO Orders option (callout 2) to remove prior orders entered on behalf of a provider (OBO) and view only orders providers directly entered.
- Use the filters (callout 3) to locate past orders by:
- Provider: Select from a list of ordering providers.
- Select the My Orders option at the top of the list to view only the orders placed by the currently logged-in provider.
- You may also search for and select one or more other providers from the list, allowing you to view and reorder items originally entered by those providers.
- Location: Select from a list of sites where the order was last placed.
- Note for all users: The filters you set here will apply in the New Orders tab across all patient charts. Update or remove the filters at any time to refine results.
- Note for non-provider users: The Provider and Location filters work the same for a non-provider as they do for a provider. When setting these filters, they will be retained going forward. Your filter selections and the displayed list of orders in Prior Orders do not change when an OBO provider is selected.
- Provider: Select from a list of ordering providers.
- Click on the order date heading checkbox (callout 4) to select all orders listed under the date, or click the order date heading text to add directly to the cart. If a Default New Order Date is configured, the item is added to the cart with the default date. If no default date is configured, users must add the order date in order details.
NOTE: Default order settings are a practice configuration. Questions regarding default order settings should be directed to practice administrators.
- To customize the order details before adding it to the cart, users can check the box next to an individual order or a past ordered date and choose to include or exclude any items in the list (callout 5).
Placing new orders using Quick Links
Easily access favorite items and quick links by starring the order where it appears in your layout.
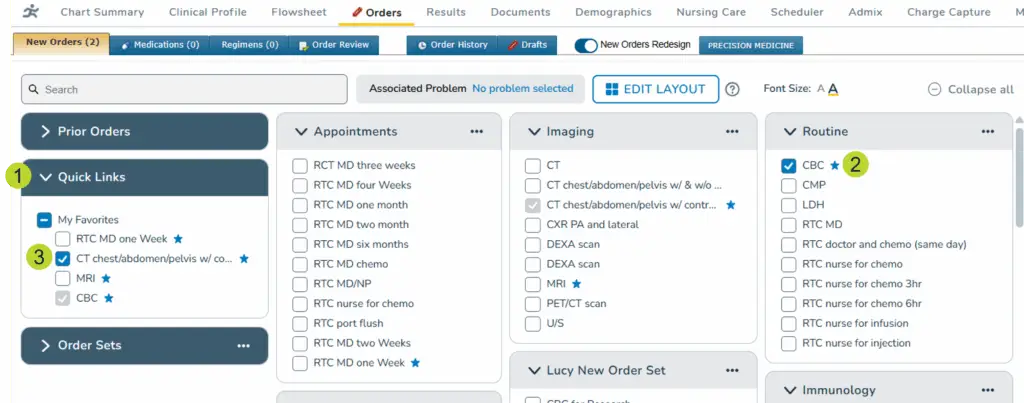
- Click Quick Links to expand the list (callout 1).
- Once you expand the list, it will remain expanded across additional charts and the system will retain this view in subsequent login sessions. If you prefer not to keep the list expanded, collapse it when finished.
- Favorite items by clicking the star next to any items in prior orders, panels, search results, order sets, etc. (callout 2).
- This will add the items to your My Favorites list in Quick Links.
- Note for non-provider users: The Favorites list the user sees is their own. It is not the selected OBO provider’s favorites list. When an order is added to the list, it will continue to display in the list when viewing any patient chart. The user can order from it after the OBO provider is selected.
- When an order is configured in a panel or set with a schedule, starring that version of the order adds it to the Favorites list with the configured schedule. Click on the order name to add the order to the cart with the configured schedule (callout 3).
- If a Default New Order Date is configured, the item is added to the cart with the default date. If no default date is configured, users must add the order date in order details.
Placing new orders using the Order Panels
The order panels display frequently used items for faster ordering, including your assigned panels from the existing New Orders experience.
All panels can be edited and rearranged by providers for more efficient use. For more information on how to customize order panels, view the setting and layout customizations article.
To order from the order panels:
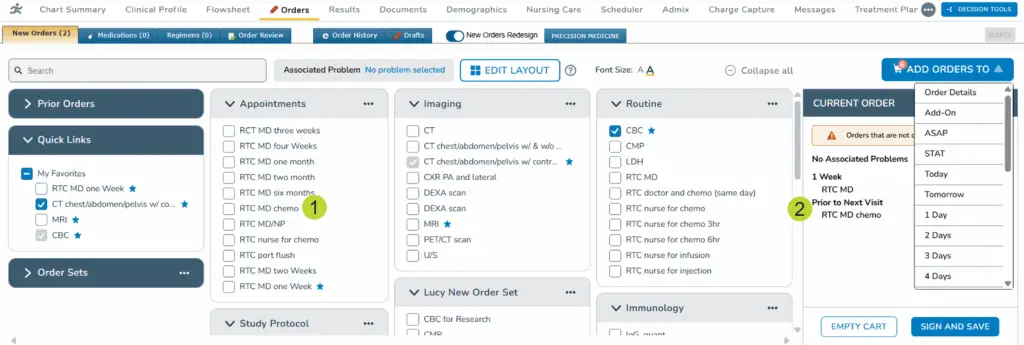
- For orders with a schedule configured in the panel, click on the order name to add the order to the cart with the configured schedule (callouts 1-2).
- If a Default New Order Date is configured, the item is added to the cart with the default date. If no default date is configured, users must add the order date in order details.
Notes for non-provider users:
- After entering an OBO provider, the list of panels displayed are the ones selected by that OBO provider. The layout displays with panels collapsed or expanded based on how the provider had it set at the time you entered their name.
- The “Default On Behalf Of values” practice preference applies to the redesign the same way it applies to the existing orders tab. If the OBO is defaulted in the patient’s chart because the non-provider selected it earlier in the day, then that provider’s layout will display as of the time the non-provider last opened the chart.
- Non-provider users can expand and collapse items as needed to view panels and select orders to enter for the patient. This will not impact the provider’s saved view, preventing the need to change things back to their original state for the provider.
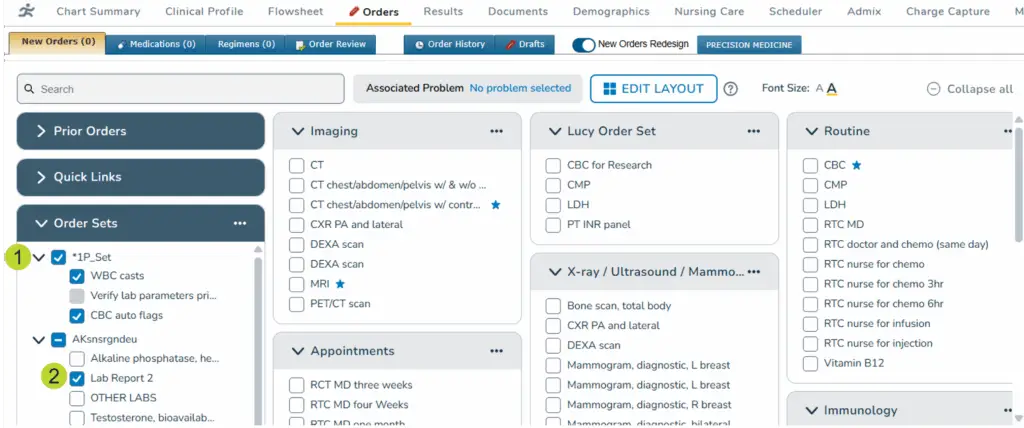
Placing new orders using Order Sets
Easily add order sets to the order. These are the same order sets saved for your practice under Manage > Order Sets.
Order sets can be customized by providers differently depending on whether they are defined by individual users or by the practice. For more information on how to customize order sets, view the setting and layout customizations article.
To order from Order Sets:
- For orders with a schedule configured, click on the order set or individual item to add the order to the cart with the configured schedule (callouts 1-2).
- If a Default New Order Date is configured, the item is added to the cart with the default date. If no default date is configured, users must add the order date in order details.
Notes for non-provider users:
- After entering an OBO provider, the list of order sets displayed are the ones selected by that OBO provider. The layout displays with sets collapsed or expanded based on how the provider had it set at the time you entered their name.
- The “Default On Behalf Of values” practice preference applies to the redesign the same way it applies to the existing orders tab. If the OBO is defaulted in the patient’s chart because the non-provider selected it earlier in the day, then that provider’s layout will display as of the time the non-provider last opened the chart.
- Non-provider users can expand and collapse items as needed to view sets and select orders to enter for the patient. This will not impact the provider’s saved view.
Adding order details
Once all your items are added, it’s time to complete the order.
Add required order details
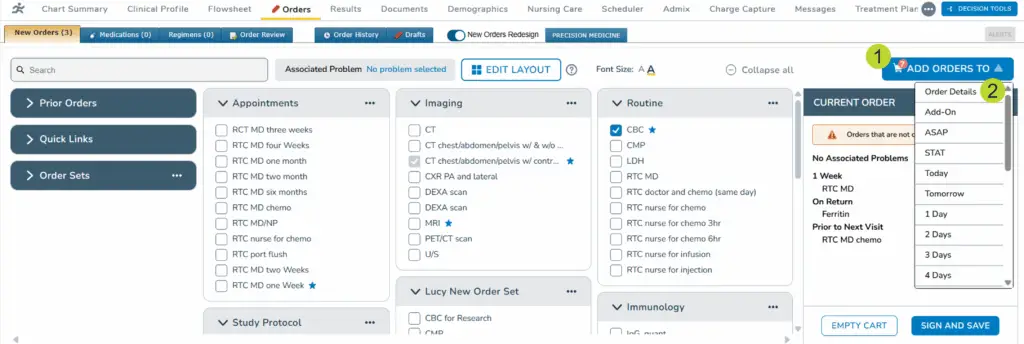
- With orders checked from the order layout, the number of selected orders is displayed on the Add Orders To Click the Add Orders To button to select a schedule option to apply to the selected orders (callout 1).
- Select Order Details (callout 2) to further customize the selected orders, e.g., perform date, instructions, perform location, in the Add Order Details screen.
- To add the selected orders directly to the cart without additional details, select the menu option for the desired schedule:
- Add-On, ASAP, or STAT
- Preferred schedule options (configured in Practice and User Preferences, see above in this article)
- Additional menu options become available when orders are added to the cart with a custom schedule or calendar date during the order session.
- Users selecting Order Details or users with the Require User to Select setting will be taken to the Add Order Details screen.
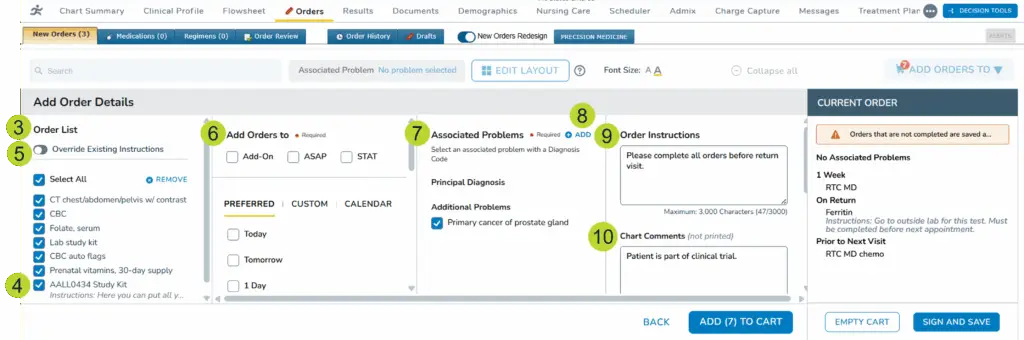
- Review all the items in the Order List column (callout 3). Select all items, one item, or multiple items at a time to add the same order details.
- Orders with instructions from the prior entry or configured in the order set or panel will display those instructions beneath the order name (callout 4).
- To replace the instructions shown for orders in the list, enable the Override Existing Instructions option (callout 5) and complete the Order Instructions
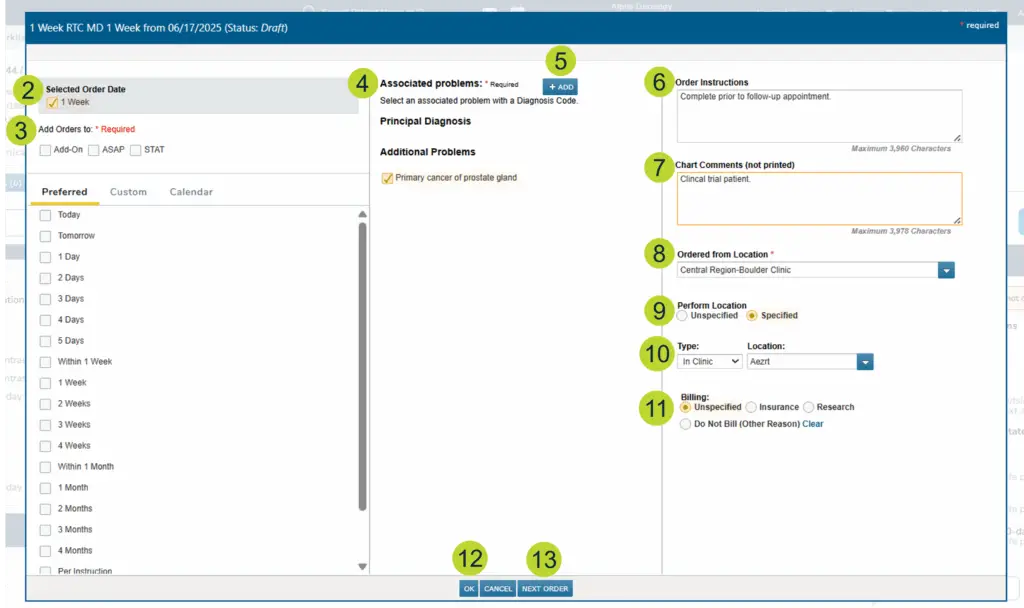
- Choose one of the following to set the order date (see callout 6 for example):
- Add-On, ASAP, or STAT.
- One of the Preferred dates set up at the practice or patient level.
- A Custom timeframe to select a specific number of days, weeks, or months, or to create a recurring schedule for the item(s).
- The Calendar to choose a specific time frame for the item(s).
- Beneath the calendar widget is a list of the patient’s next appointments for that month, making it easier to determine the best perform date.
- In this window, you may also change the Associated Problems (callout 7).
- Choose one, multiple, or all displayed diagnoses to associate with the order.
- If a needed diagnosis is not shown, click Add in the upper corner (callout 8).
- This will open the Edit Patient Problem window where you can add a new Problem for the patient.
- In the last column in the window, you can enter up to 4,000 characters in the Order Instructions box (callout 9).
- The instructions entered will apply to all checked orders in the Order List.
- To replace instructions displayed for checked orders in the Order List, the Override Existing Instructions toggle must be enabled. If this option is not enabled, content added to the Order Instructions field will not be applied when the orders are added to the cart.
- You may also enter up to 4,000 characters in the Chart Comment text box (callout 10).
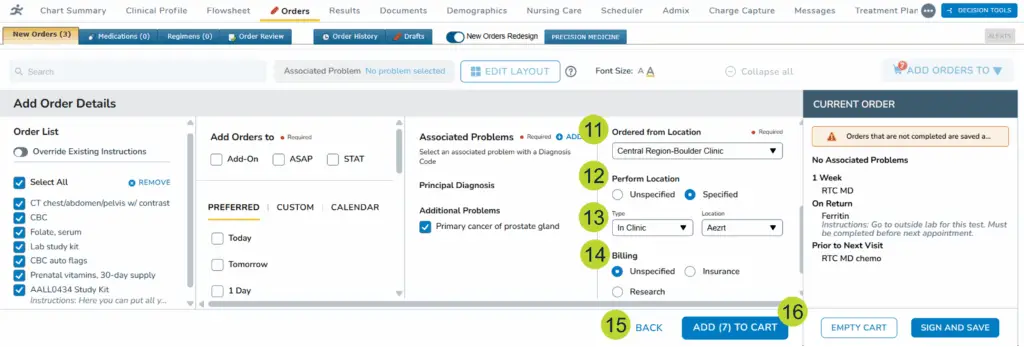
- Beneath that, change the Ordered from Location to the necessary practice if it differs from the location selected during login (callout 11).
- Specify a Perform Location for the item, if needed (callout 12).
- If you choose the Specified option, the Type and Location selections will be required (callout 13).
- Lastly, select a Billing option (callout 14).
- By default, Unspecified will be selected.
- You can change this to Insurance, Research, or Do Not Bill.
- If you need to return to the orders screen to add or remove items, click the Back option (callout 15). If all the required information is completed, click the Add to Cart button (callout 16).
Editing items in the cart
Changes can be made to orders in the cart by clicking on the name of an individual item or the header for bundled items. Choosing an individual item will only change the details for that order while choosing a header for bundled items will change the details for all orders in that item.
Edit bundled items
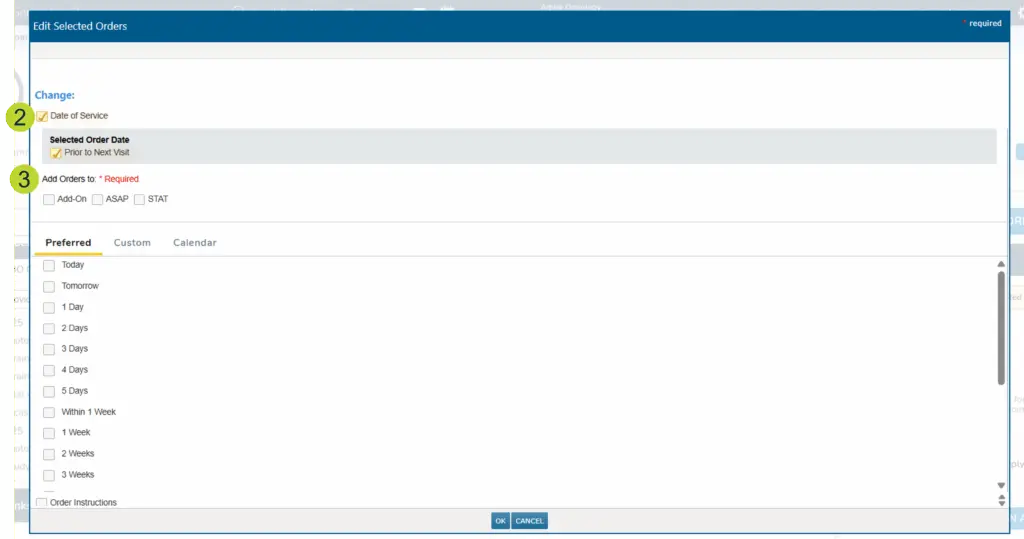
- Click on the header for a bundled order (callout 1).
- The order will display the pre-selected Date of Service (callout 2).
- If needed, choose one of the following to change the order date (callout 3):
- Add-On, ASAP, or STAT.
- One of the Preferred dates set up at the practice or patient level.
- A Custom timeframe to select a specific number of days, weeks, or months, or to create a recurring schedule for the item(s).
- The Calendar to choose a specific time frame for the item(s).
- Beneath the calendar widget is a list of the patient’s next appointments for that month, making it easier to determine the best perform date.
- Beneath the calendar widget is a list of the patient’s next appointments for that month, making it easier to determine the best perform date.
- Check the box next to Order Instructions to enter or edit up to 4,000 characters in the text box (callout 4).
- Any content entered in the Order Instructions field will show in the cart.

- Any content entered in the Order Instructions field will show in the cart.
- Check the box next to Associated Problem(s) to change the diagnosis associated with all the orders in the bundle (callout 5).
- Choose one, multiple, or all displayed diagnoses to associate with all the orders in the bundle.
- If a needed diagnosis is not shown, click Create a new problem (callout 6).
- This will open the Edit Patient Problem window where you can add a new Problem for the patient.

- Check the box next to Chart Comments to enter or edit up to 4,000 characters in the text box (callout 7).

- Check the box next to Bill to change the billing options (callout 8).
- By default, Unspecified will be selected. Orders entered with Unspecified will not display this value in Order History, the Orders Queue, or the order detail dialog accessed from the Flowsheet.
- You can change this to Insurance, Research, or Do Not Bill. These selections will display in the cart for the order.
- Click the Clear option to return to the default option.

- Check the box next to Location to change the perform location for all the orders in the bundle (callout 9).
- If you choose the Specified option, the Type and Location selections will be required (callout 10).
- Click the OK button to save your changes (callout 11).

Editing individual items
- Click on an individual order in the cart (callout 1).
- The order will display the pre-selected order date (callout 2).
- If needed, choose one of the following to change the order date (callout 3):
- Add-On, ASAP, or STAT.
- One of the Preferred dates set up at the practice or patient level.
- A Custom timeframe to select a specific number of days, weeks, or months, or to create a recurring schedule for the item(s).
- The Calendar to choose a specific time frame for the item(s).
- Beneath the calendar widget is a list of the patient’s next appointments for that month, making it easier to determine the best perform date.
- Change the Associated Problems (callout 4) by:
- Choosing one, multiple, or all displayed diagnoses to associate with the order.
- If a needed diagnosis is not shown, click Add in the upper corner (callout 5).
- This will open the Edit Patient Problem window where you can add a new Problem for the patient.
- In the last column in the window, enter or edit up to 4,000 characters each into the Order Instructions and Chart Comment text boxes (callouts 6-7).
- Any content entered in the Order Instructions field will show in the cart.
- Beneath that, change the Ordered from Location, if needed (callout 8).
- Add or change the Perform Location for the item, if needed (callout 9).
- If you choose the Specified option, the Type and Location selections will be required (callout 10).
- Lastly, change the Billing option (callout 11).
- By default, Unspecified will be selected. Orders entered with Unspecified will not display this value in Order History, the Orders Queue, or the order detail dialog accessed from the Flowsheet.
- You can change this to Insurance, Research, or Do Not Bill. These selections will display in the cart for the order.
- Click the Clear option to return to the default option.
- Click the OK button to save your changes (callout 12) or click the Next Order button to update another order in the cart (callout 13).
Save orders
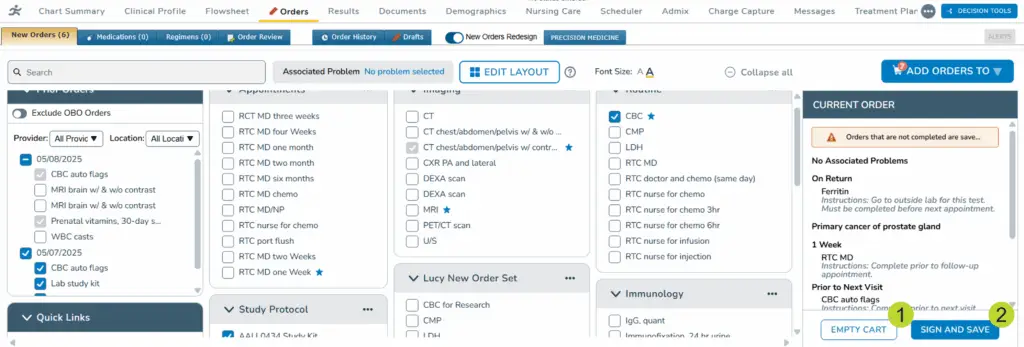
- All items in the cart can be removed by clicking Empty Cart (callout 1).
- To complete your order, click Sign And Save (callout 2).
- For practices that require a PIN, providers will be prompted to enter their PIN to complete the order.
Related Articles:
|