Task & Time Management Copied
We’re introducing an enhancement to iKnowMed Generation 2 that will help simplify patient care management. The new Task & Time Management feature is designed to streamline the enrollment process for Principal Care Management (PCM) and Chronic Care Management (CCM) services, providing an intuitive way to track activities and time spent in a more structured format.

Getting started
Set practice preferences
Before enrolling patients in a care management service and tracking time spent on care management tasks, your practice must be set up to access the feature.
Please work with your Ontada Account Manager to activate this feature for your practice. Once the feature is turned on, you must grant access to individual users at your practice.
Set user permissions
To grant individual users access to the Task & Time Management feature:
- Go to Admin > Users.
- Select a user and click the Edit User button to adjust their settings.
- Select the Permission page.
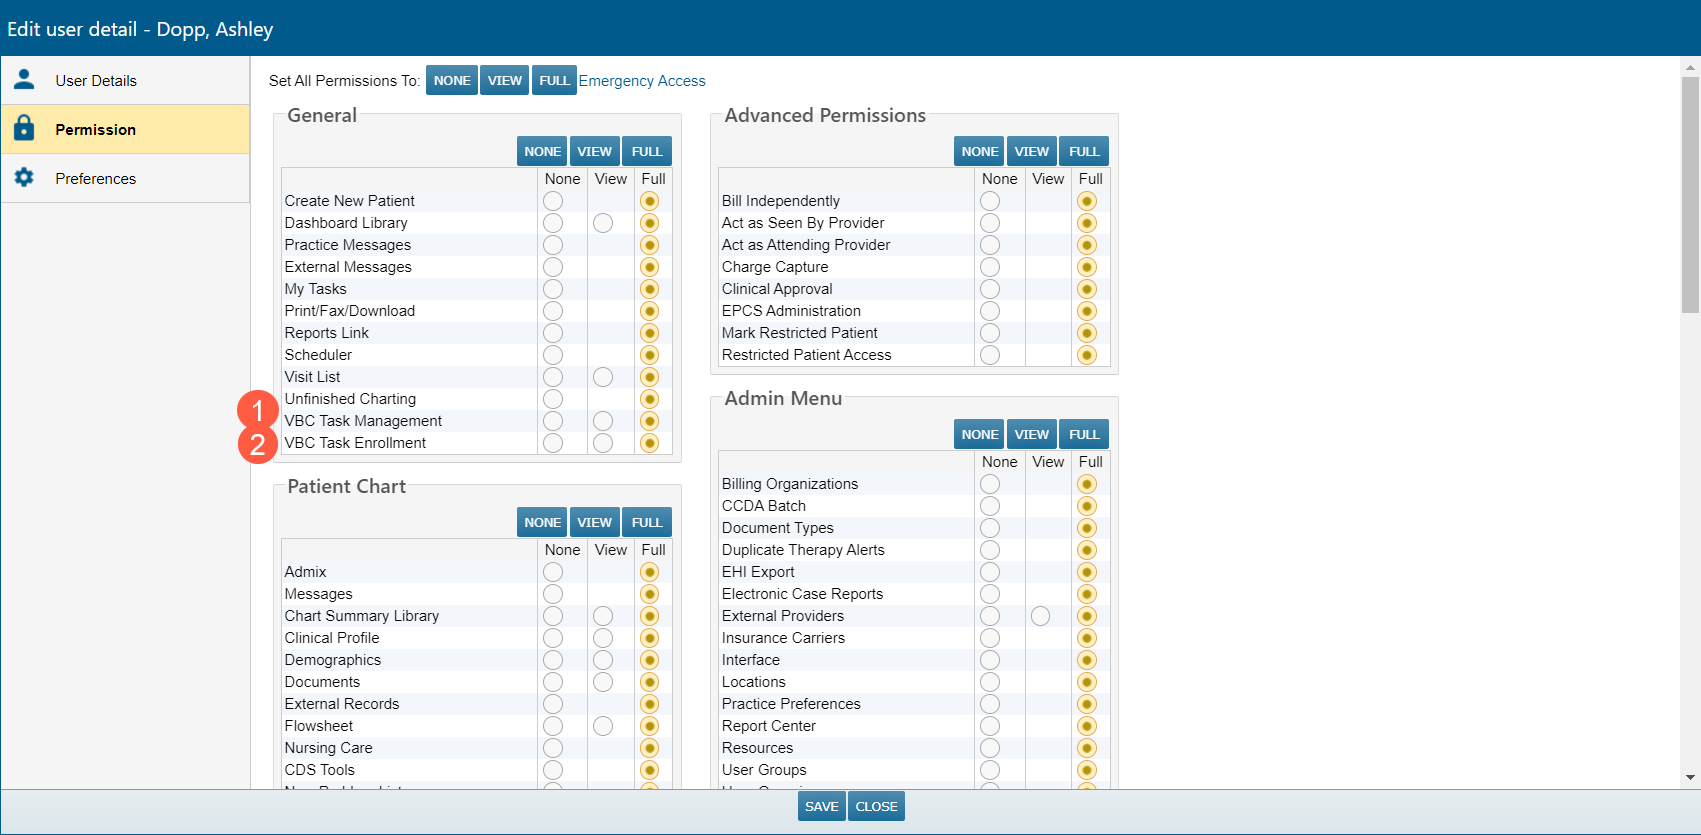
- Under the General section, change the user’s permission as follows:
- VBC Task Management (callout 1):
- None: Choose this option for users who should not have access to the Task & Time Entry feature. This option will be selected by default.
- View: Choose this option for users who should be able to access and view the Task & Time Entry feature, but not actively update it.
- Full: Choose this option for users who should be able to access the Task & Time Entry feature allowing them to track tasks and time spent on those tasks.
- VBC Task Enrollment (callout 2):
- None: Choose this option for users who should not have access to the Enrollment Management feature. This option will be selected by default.
- View: Choose this option for users who should be able to access and view the Enrollment Management feature, but not actively enroll patients.
- Full: Choose this option for users who should be able to access the Enrollment Management feature and enroll or unenroll patients in a care management program.
- Users can have one or both permissions. This allows you to grant users the ability to handle enrollment and task management activities as needed.
- VBC Task Management (callout 1):
- Save your changes.
To make these changes to a group of users, follow the Help site instructions that explain how to apply a specific user profile to one or more user accounts.
Enrolling a patient in PCM or CCM
- Patients eligible for PCM or CCM will be automatically identified by iKnowMed Generation 2 using a nightly service that looks for patients aged 65 years or older.
- The system will mark those patients with a Potentially Eligible icon and link in the collapsed and expanded patient banner (callouts 1 and 2).
- Click the icon or link to open the Task & Time Management feature.


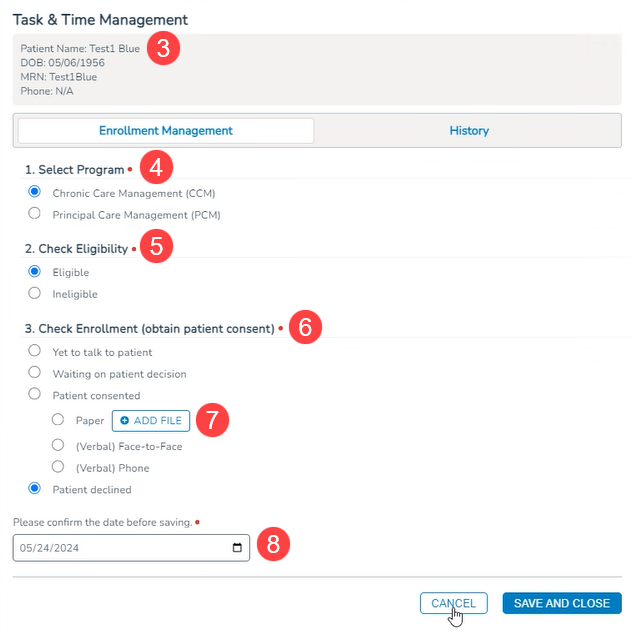
- The patient’s demographic information will be displayed at the top of the feature (callout 3).
- Beneath that is the Enrollment Management section that must be completed to enroll a patient in a service.
- Choose an option under Select Program and Check Eligibility (callouts 4 and 5).
- If you mark the patient as eligible, and the patient consents to enrollment, select the patient’s consent status under Check Enrollment (callout 6).
- If the patient completed a paper consent form, select the Add File button to attach a copy of the signed form (callout 7). This form will remain in the Task & Time Management feature, and it will not appear in the patient’s Documents tab.
- Lastly, confirm or change the enrollment date (callout 8).
- Save your changes.
- The icon and link in the expanded or collapsed patient banner will now show the patient as Enrolled (callouts 9 and 10).


- If at any time you need to unenroll the patient, click the icon or link in the patient banner to open the Task & Time Management feature.
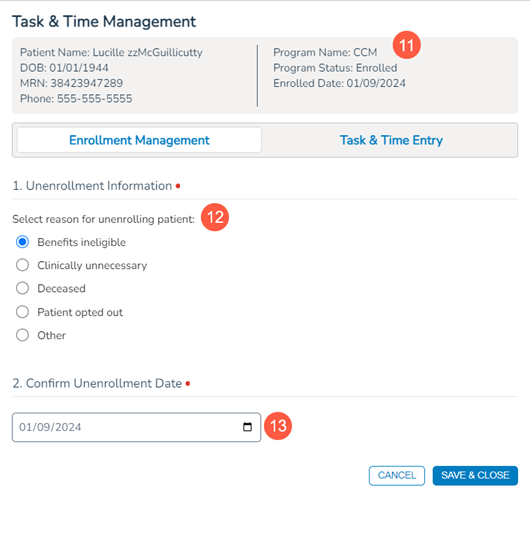
- The patient’s demographic information at the top of the feature will also include their enrollment information (callout 11).
- The Enrollment Management section will now provide the ability to unenroll the patient.
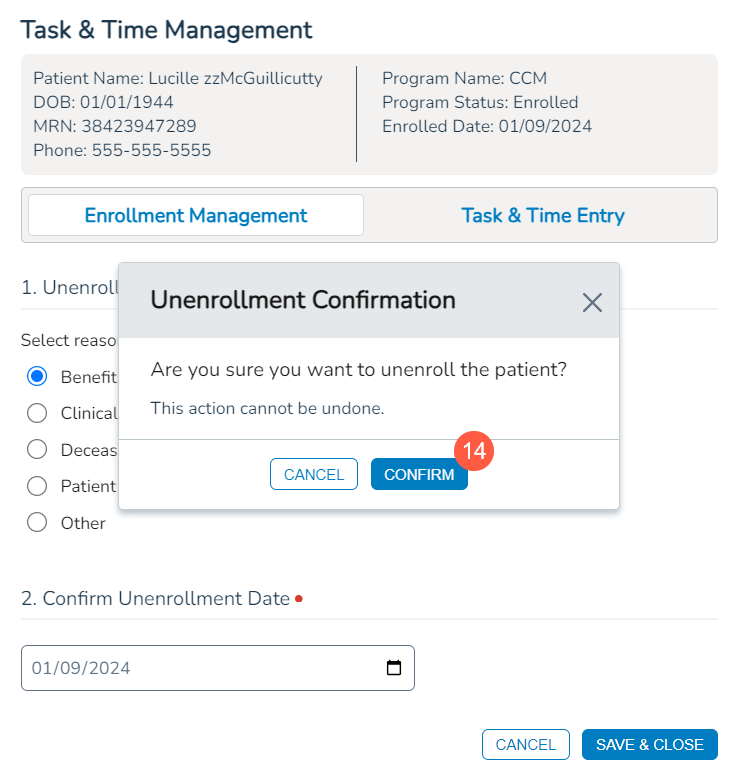
- Select a reason under Unenrollment Information (callout 12), add the unenrollment date (callout 13), and save your changes.
- To complete the unenrollment, click the Confirm button in the confirmation window (callout 14).
- The icon and link in the expanded or collapsed patient banner will now show the patient as Unenrolled (callouts 15 and 16).

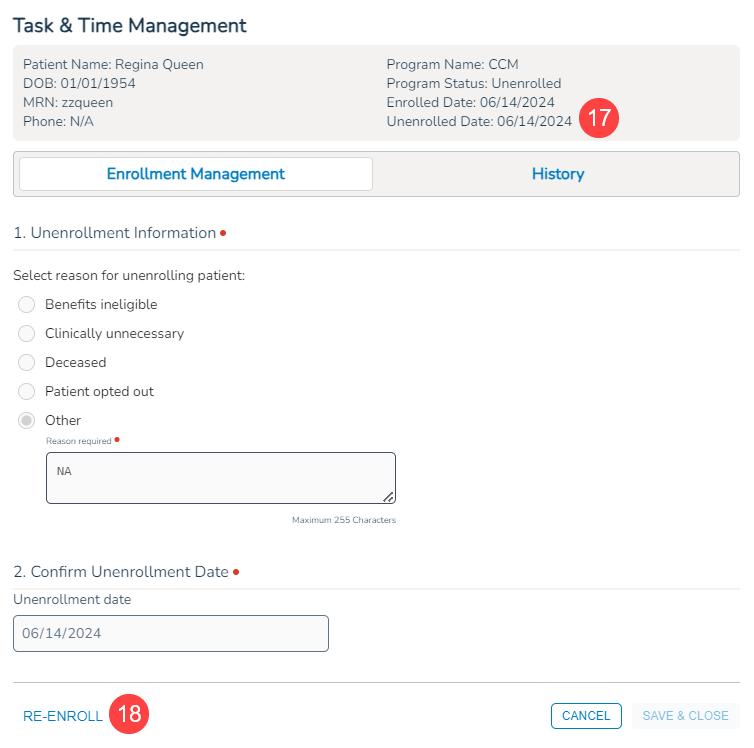
- To re-enroll the patient, click the icon or link in the patient banner to open the Task & Time Management feature.
- The patient’s demographic information at the top will now include the unenrolled date (callout 17).
- Click on the Re-Enroll link (callout 18) at the bottom of the window to get started.
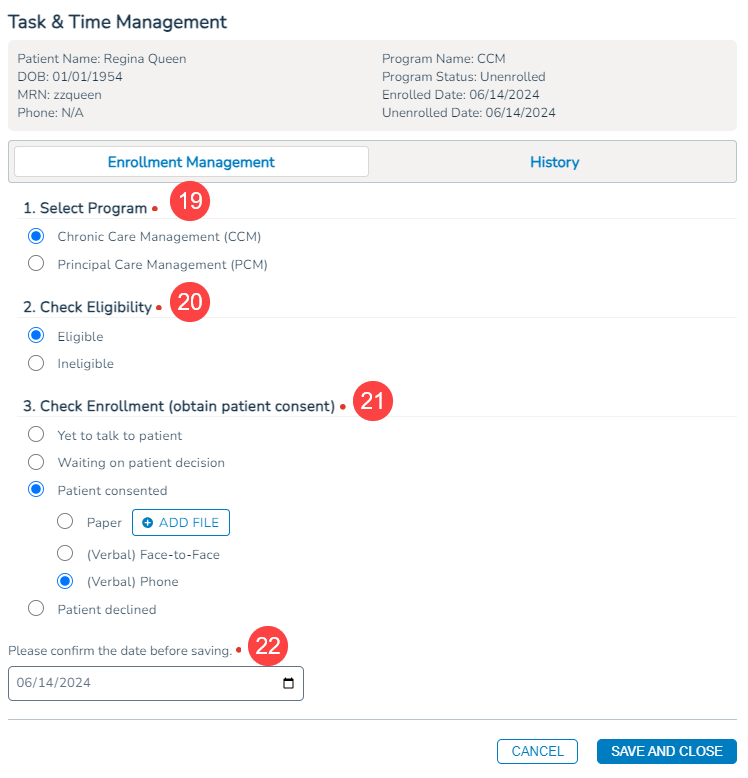
- Choose an option under Select Program and Check Eligibility (callouts 19 and 20).
- If you mark the patient as eligible, and the patient consents to enrollment, select the patient’s consent status under Check Enrollment (callout 21).
- Lastly, confirm or change the re-enrollment date (callout 22).
- Save your changes.
- The icon and link in the expanded or collapsed patient banner will now show the patient as Enrolled (callouts 23 and 24).


- If a user marks the patient as Ineligible for enrollment or the patient is eligible but is marked as Patient declined, the patient banner will show the ineligible/declined icon
 .
. - If the patient is eligible, but is marked as Waiting on patient decision, the patient banner will show the waiting icon
 .
. - If the patient is eligible, but is marked as Yet to talk to patient, the patient banner will show the yet to talk icon
 .
.
Tracking PCM or CCM tasks
Once the patient is enrolled in a service, you may begin tracking tasks and time spent on those tasks.
- Click the Enrolled icon or link in the patient banner to open the Task & Time Management feature.
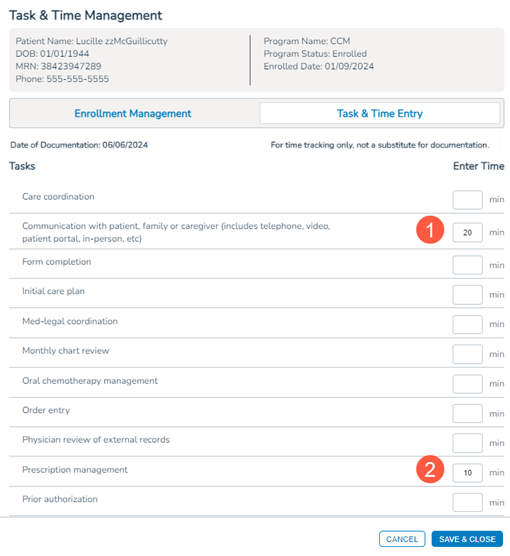
- Use the Task & Time Entry section to locate a task.
- Enter the time spent on that task in minutes (1-99) in the blank box under the corresponding Enter Time column. You may enter time spent on more than one task at a time (callouts 1 and 2).
NOTE: A disclaimer at the top serves as a reminder that the purpose is to use this feature for tracking time only and does not replace documentation.
- Save your changes.
- The system will provide the ability to edit time spent for the current day only. The user who logged the entry can edit it in minutes (0-99) until it the next day (callout 3).

Review enrollment history and captured tasks and times
Enrollment statuses, tasks, and time spent on those tasks are captured in the History feature and Task & Time Capture Report. Both locations provide a convenient way to track all changes made to task and time for each patient.
Task & Time Management History feature
After completing enrollment activities or capturing or editing time spent on care management tasks, you can view an audit history of these changes at the patient chart level in the History feature.
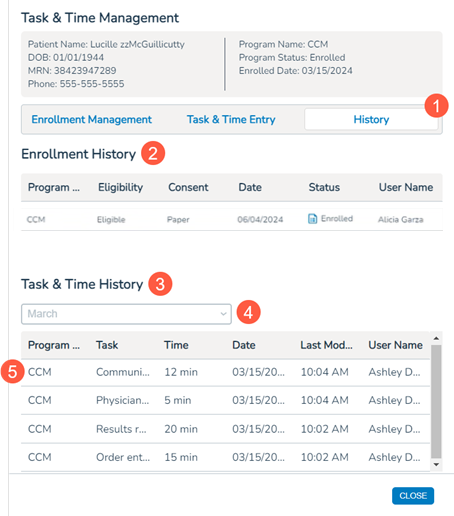
- Click the History section in the Task & Time Management window (callout 1).
- The Enrollment History area (callout 2) will provide an audit trail of the patient’s enrollment process, including the selected care management program, the patient’s eligibility, the consent status, the enrollment status, and more.
- The audit history will also capture details if the patient is unenrolled from a care management program.
- If a patient signed a paper consent and you uploaded it to the feature, an icon will appear next to their enrollment Status. Click the icon to view, print, and save the consent as needed.
- The Task & Time History area (callout 3) will provide an audit trail of any care management tasks completed for the patient and the time spent on those tasks.
- Use the time drop-down (callout 4) to see tasks completed from this month or the previous month.
- If no tasks were captured for the selected month, a message will appear stating there are no logs available.
- Each time a new task and time is captured for a patient, a line item will appear in the table (callout 5).
- Please note that when editing time spent on a task, the History feature will not reflect the update immediately. There will be a slight delay before the table reflects the change. In a future release, this functionality will be enhanced to display real-time changes.
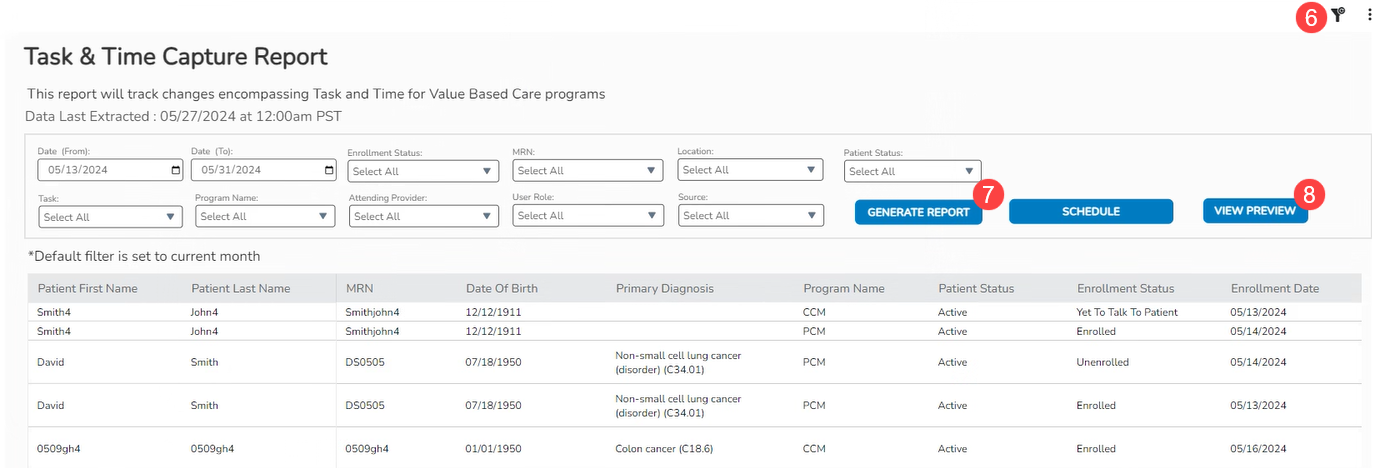
Task & Time Capture Report
Users must have access to Reports and their VBC Task Enrollment permission set to Full to access the Task & Time Capture Report.
To filter the report for more targeted information, use the following filters:
- Date (From) and Date (To): Review tasks and times from a specified period.
- Enrollment Status: Locate patients marked as declined, eligible, enrolled, ineligible, potentially eligible, unenrolled, waiting on patient, or yet to talk to patient.
- MRN: Locate a specific patient by their medical record number.
- Location: Locate patients by where they receive their treatment.
- Patient Status: Locate patients marked as active, deceased, hospice, inactive, merged, or unknown in their Demographics tab.
- Task: Filter the report by the tasks recorded in the Task & Time Entry feature.
- Program Name: Locate patients by the care management program recorded for them in the Enrollment Management feature.
- Attending Provider: Locate patients by their treating physician.
- User Role: Filter the report by the role of the user adding or editing information in the Task & Time Entry feature.
- Source: Filter the report by where the entry task and time entries were recorded. This filter will help practices when the feature is integrated with other applications, such as Carevive.
- You can save your current filter selections for next time or clear them by selecting the filter icon in the upper corner of the report (callout 6).
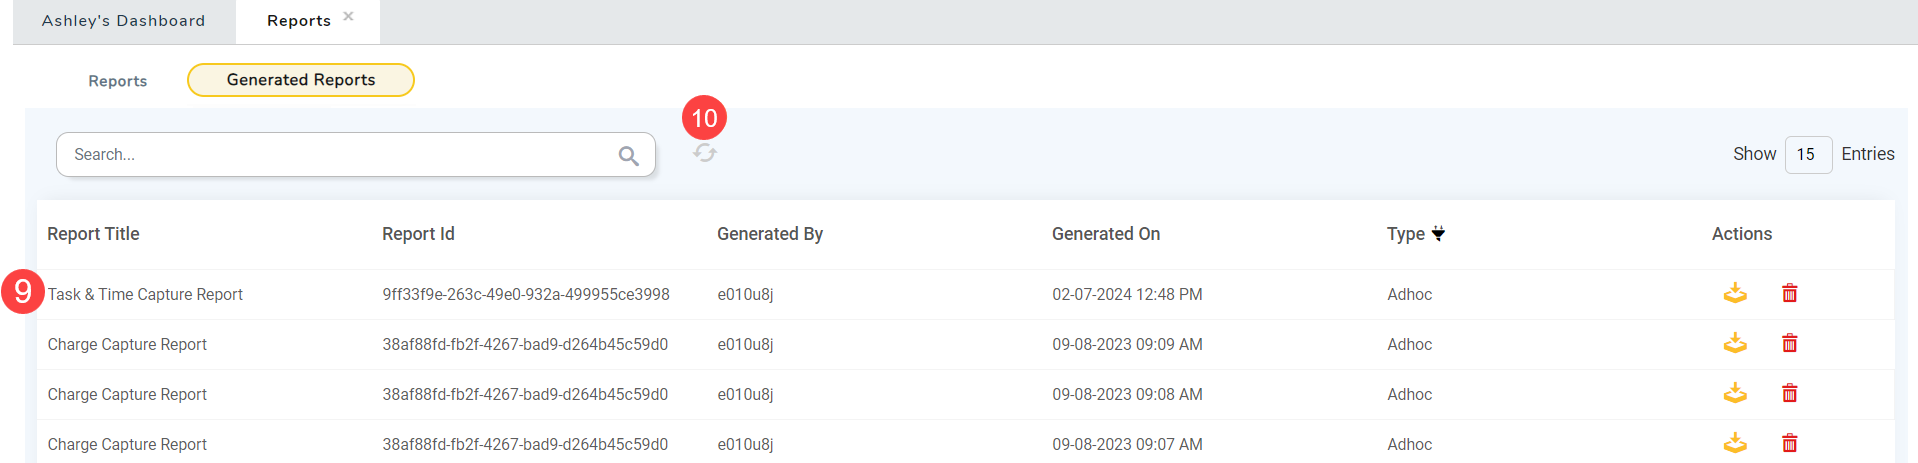
- To create a savable report with your results, click Generate Report (callout 7).
- To view your results in the table, click View Preview (callout 8).
- Clicking Generate Report will initiate the download, which will appear in your list of Generated Reports when the download is complete (callout 9). If needed, click the refresh icon (callout 10) to see the report in your Inbox.